I have been posting a lot on the photography community on Reddit lately, and someone asked how I get the editing style I’ve had lately. I’ve always wanted to do one of those neat posts about editing settings, and now I’ve got an excuse.
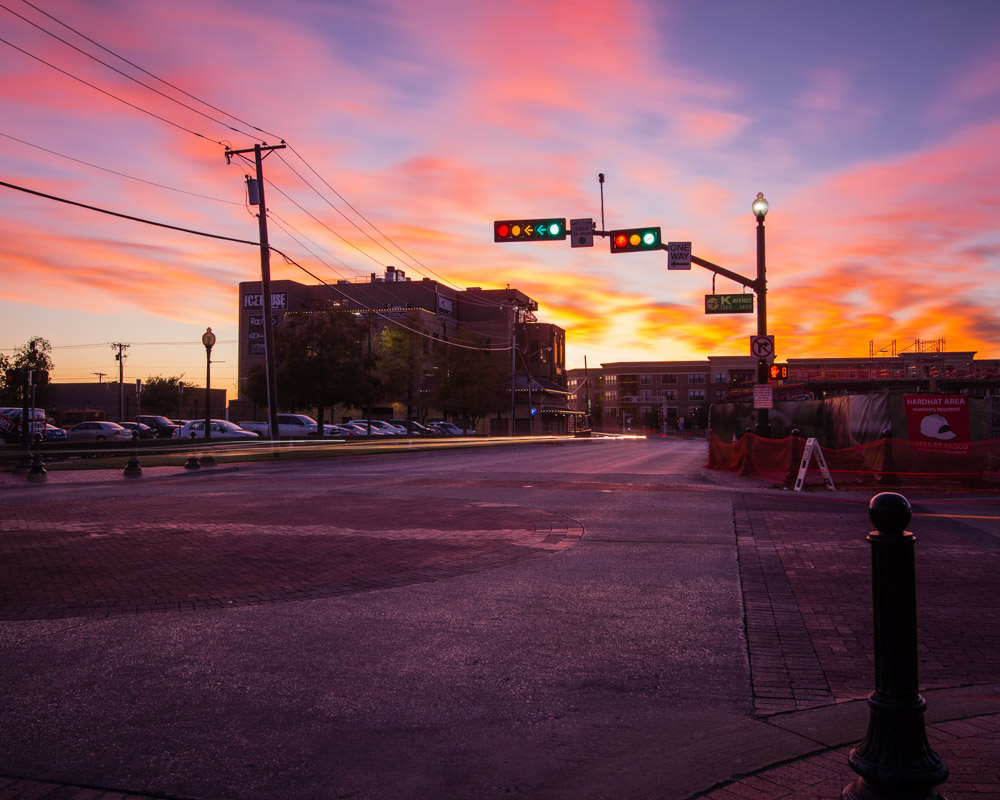
The image I’m going to work through is the one from my Ep 5: Weekly Wednesday Photo Sharing blog post this week. I’ve also embedded the final image below.

ISO 400 | f/8 | 30s | 24mm
Shooting
The actual lighting, composition, focal length, and filters are just as important as the settings in Lightroom. My equipment for this shot is pretty standard for most of my long exposures:
- Canon 6D
- Sigma 24 f/1.4 DG HSM Art lens for Canon EF
- tripod (Feisol CT-4301)
- Lee 100mm filter holder, with 77mm wide angle adapter ring
- Lee Big Stopper 10 stop neutral density filter
My actual shooting process is fairly standard, and doesn’t vary much for tripod work.
- Set up tripod, with camera in Manual, lens in manual focus
- Focus camera using live view and 10x magnifier on something nearby / of interest. I think I focused on the traffic lights. At 24mm and f/8, depth of field is huge and focus is not critical.
- Set the exposure. My default is ISO 100 and f/8, with shutter speed at whatever.
- Put on the Big Stopper
- Count out 30 clicks on the shutter speed wheel. I have my shutter speed wheel set to adjust on 1/3 stops, so 30 clicks adjusts 10 stops. I also have live view on during this, so I can see changes
- Adjust ISO / aperture to get the shutter speed I want. Sometimes ISO 100 is too low and I don’t want to get out my remote. Notice last night’s shot was at ISO 400?
- Take the shot. Sometimes take several.
Shooting is pretty straight forward. Getting an image with great colors is almost always helped out by great lighting. This image was about 20 – 30 minutes before the sun dropped below the horizon. The light was soft, it was getting dark, and the clouds in the sky lit up like fire. That’s the lighting you want. It is fleeting, but so incredible. Check out my blog post for a cell phone picture of the lighting. This might give you a better reference for what everything looked like.
Editing
I do 95% of my editing in Lightroom 5. I do the other 5% in Photoshop CS5.5. Photoshop is for panoramas, composites, and the other rare unusual effect I try, such as the Orton Effect. During my Welcome to Downtown Plano timelapse project, I developed a Lightroom preset in an effort to get a consistent look to all the photos in that video. I have since decided I really like what that preset does, and it’s nothing complicated.
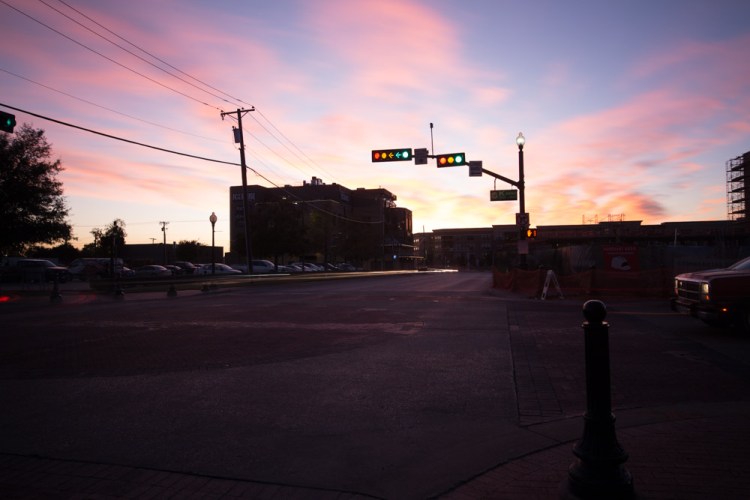
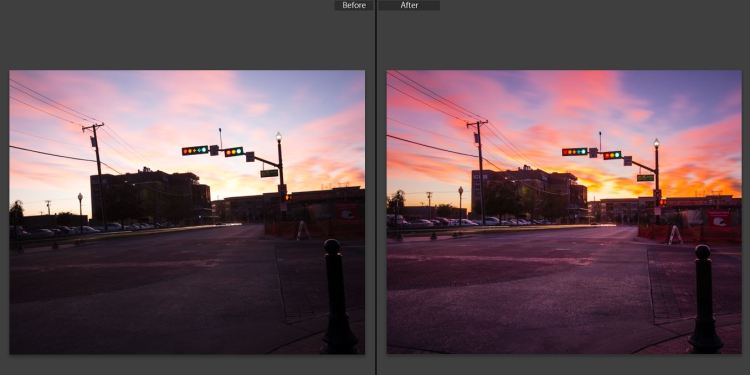
So below is the original, uncropped, unedited photo. I created a virtual copy in Lightroom, hit “reset” to remove all my settings, and hit “export.” As you can see, the highlights are very bright, but not blown out, and the shadows are underexposed. This scene had a lot of dynamic range and needed some help to get it looking good.
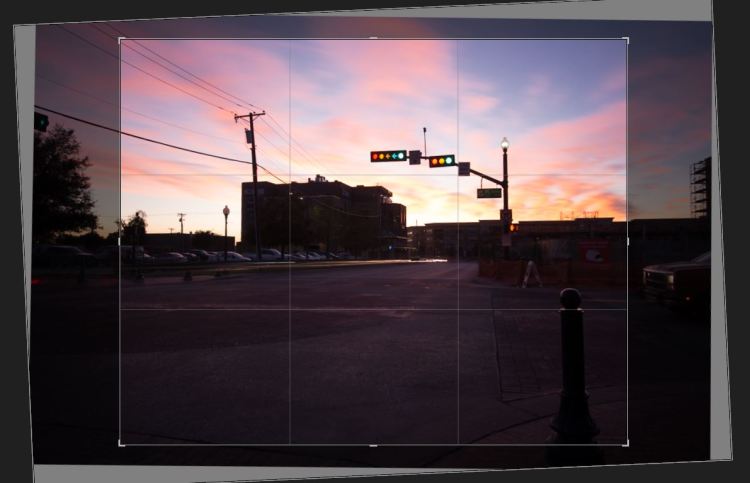
The first thing I do is in the Lens Corrections tab. I like non-converging vertical lines. I usually use the “vertical” option, but I didn’t like what it did. It chose the street light, and I wanted the building in the background to be vertical. My version of Lightroom does not have an automatic camera profile for my 24mm. After correcting the verticals (really, getting them close enough), I cropped to a 4×5 ratio.

After cropping, I applied my preset. I’ll show you the settings below.
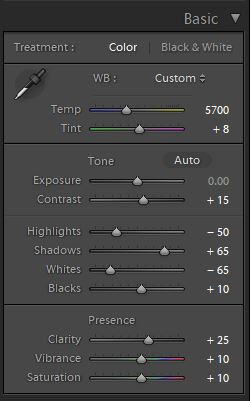
From the Basic module
- White Balance: 5700K
- Tint: +8 pink
- Exposure: 0.00
- Contrast: +15
- Highlights: -50
- Shadows +65
- Whites: -65
- Blacks: +10
- Clarity: +25
- Vibrance: +10
- Saturation: +10
Tone curve was adjusted to the standard Medium Contrast curve, which I haven’t shown to the right.

From the Hue / Saturation / Luminance module:
- Red: saturation +23, luminance -18
- Orange: luminance -13
- Yellow: luminance +16
- Blue: saturation +11, luminance -32
- Purple: saturation +12, luminance -20
- Magneta: luminance -18
I did not make any Hue adjustments, hence its omission.
And that’s it. I leave sharpening at the Lightroom defaults usually. Sometimes I add a slight vignette. The gist of my editing pushes the exposure up on the shadows, pulls the highlights back, increases contrast and saturation, and adjusts the saturation and brightness of specific colors. There’s not a whole lot to it. Here’s the before and after, side by side. That purple cast visible on the street really was there. I took this image at that fleeting moment when the sky colors everything else in the scene.
Thanks for reading! Let me know about any questions!
